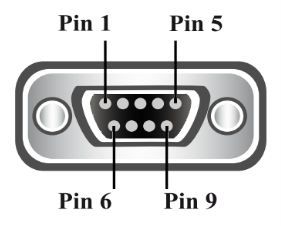
# Start-up Guide: ReXgen 1

### To download the ReXdesk software

1. Visit Influx Technology.com >> Support >> ReXgen Series >> [<mark style="color:blue;">Software links</mark>](https://app.gitbook.com/s/yaIp238RV3KBmFX91Zom/software-links/rexdesk-software-links)>> ReXdesk Download
2. Windows Search  >> [<mark style="color:blue;">ReXgen Drivers</mark>](https://docs.influxtechnology.com/support_guides/rexgen-series-product-manuals/rexgen-1/rexgen-1-product-manual/getting-started/driver-installation) >>  Select and Install

{% hint style="danger" %}

#### WARNING:

* CAN BUS AND USB ARE NOT ISOLATED.
* CARE MUST BE TAKEN WHEN PLUGGING THE USB INTO THE DEVICE. REMOVING THE POWER SUPPLY WHEN THE DEVICE IS INTERFACED WITH A PC VIA USB IS ADVISED.
  {% endhint %}

{% hint style="warning" %}

#### Notes:

* CAN Bus and USB Isolators can be purchased separately.
* Please do not use the logger's USB port for data logging, as it may damage the port and will not be covered under warranty.
  {% endhint %}

### Connector Details

ReXgen 1 comes with one 9-pin Standard D-Type connector.

<img src="https://1612018018-files.gitbook.io/~/files/v0/b/gitbook-x-prod.appspot.com/o/spaces%2FTCRfbN5hBLeUzIaKHbJ7%2Fuploads%2FCDMbSO5lUiuAxk0S6epN%2Fimage.png?alt=media&#x26;token=5606eaf5-2190-45f4-a6e1-b37d416f48e1" alt="" data-size="original">

<table data-header-hidden><thead><tr><th width="282"></th><th></th></tr></thead><tbody><tr><td><strong>PIN No DB9 (Male with Nuts)</strong></td><td><strong>PIN Function PWR/CAN0/Digital/LIN</strong></td></tr><tr><td> <strong>Pin 1</strong></td><td>NC</td></tr><tr><td> <strong>Pin 2</strong></td><td>CAN - Low</td></tr><tr><td> <strong>Pin 3</strong></td><td>GND</td></tr><tr><td> <strong>Pin 4</strong></td><td>NC</td></tr><tr><td> <strong>Pin 5</strong></td><td>Power GND</td></tr><tr><td> <strong>Pin 6</strong></td><td>NC</td></tr><tr><td> <strong>Pin 7</strong></td><td>CAN - High</td></tr><tr><td> <strong>Pin 8</strong></td><td>NC</td></tr><tr><td> <strong>Pin 9</strong></td><td>Power Supply 5V to 27V</td></tr></tbody></table>

{% hint style="danger" %}

#### Warning:

* The connector must be tightened securely to connect properly, ensuring reliable operation.
* Each end of the CAN bus must be terminated with a 120 Ohm resistor across CAN H & CAN L.
* Do not short-circuit any pins.
* Do not use the logger's USB port for data logging, as it may damage the USB port, which won't be covered under warranty.
  {% endhint %}

<table><thead><tr><th width="146"></th><th width="133"></th><th width="143"></th><th></th></tr></thead><tbody><tr><td><img src="https://1612018018-files.gitbook.io/~/files/v0/b/gitbook-x-prod.appspot.com/o/spaces%2FTCRfbN5hBLeUzIaKHbJ7%2Fuploads%2FFWUoHptQOUlC8N0QJDRq%2Fimage.png?alt=media&#x26;token=7b5aa3df-d715-4c7d-9f08-7f1f5c950e38" alt="" data-size="line"></td><td>LED 1</td><td>Channel 0</td><td>Green</td></tr></tbody></table>

<table data-header-hidden><thead><tr><th width="223"></th><th></th></tr></thead><tbody><tr><td> <strong>LED Patterns</strong></td><td> <strong>Description</strong></td></tr><tr><td> <img src="https://1612018018-files.gitbook.io/~/files/v0/b/gitbook-x-prod.appspot.com/o/spaces%2FTCRfbN5hBLeUzIaKHbJ7%2Fuploads%2FFWUoHptQOUlC8N0QJDRq%2Fimage.png?alt=media&#x26;token=7b5aa3df-d715-4c7d-9f08-7f1f5c950e38" alt="" data-size="line"> <img src="https://1612018018-files.gitbook.io/~/files/v0/b/gitbook-x-prod.appspot.com/o/spaces%2FTCRfbN5hBLeUzIaKHbJ7%2Fuploads%2FFWUoHptQOUlC8N0QJDRq%2Fimage.png?alt=media&#x26;token=7b5aa3df-d715-4c7d-9f08-7f1f5c950e38" alt="" data-size="line"> <img src="https://1612018018-files.gitbook.io/~/files/v0/b/gitbook-x-prod.appspot.com/o/spaces%2FTCRfbN5hBLeUzIaKHbJ7%2Fuploads%2FFWUoHptQOUlC8N0QJDRq%2Fimage.png?alt=media&#x26;token=7b5aa3df-d715-4c7d-9f08-7f1f5c950e38" alt="" data-size="line"></td><td><p><strong>Blinking</strong> </p><p><strong>Slow-</strong> Logging</p><p><strong>Fast–</strong> CAN Error/Check Connection/Incorrect Baud Rate</p></td></tr><tr><td><img src="https://1612018018-files.gitbook.io/~/files/v0/b/gitbook-x-prod.appspot.com/o/spaces%2FTCRfbN5hBLeUzIaKHbJ7%2Fuploads%2FLVPKttWk7R2gkn2ASpPk%2FPicture1.png?alt=media&#x26;token=bcd0f203-8904-44ab-8fa9-7f48c10f526c" alt=""></td><td><strong>Bold–</strong> Not logging but configuration active</td></tr></tbody></table>

### To update the firmware

Open ReXdesk, connect the logger and click the ‘Reflash’ option under the Device tab.

Reflash – Select the required firmware to update the logger.

{% hint style="warning" %}

#### Notes:

* Do not disconnect the logger until the logger LED stops flashing. The logger will automatically reconnect to the software after reflashing.
* Please ensure that the internal storage is formatted after reflashing the logger.
  {% endhint %}

### To set the time

Open ReXdesk, connect the logger and click  ‘Set Time’ on the top taskbar.

To synchronise the logger’s time with your PC, select ‘Synchronise with PC.

**Or**

To manually set the logger’s time, select ‘Set Custom Date Time’.

Click ‘Set Time” to save.

{% hint style="warning" %}
Notes:

* If you see the logger logging with the wrong timestamp, check the RTC battery.
* [<mark style="color:blue;">Click</mark> ](https://youtu.be/ff4hsYAiA5c)for instructions on turning on the battery.
  {% endhint %}

### To start logging

Open ReXdesk, connect the logger, double-click or drag and drop the ‘Log All’ icon into the configuration window.

Click the ‘Run’ icon on the top taskbar and save the project.

Once the Configuration is uploaded successfully, click OK.

### How to [<mark style="color:blue;">set up a ReXgen</mark>](https://youtu.be/RYeihIAw2Wo?si=b2FuA6IFAxPSSLZH) datalogger.

### To open logged data from internal storage

Click the Internal Storage tab, then select the file you wish to open.

Click the Download tab, then select the required format for download.

{% hint style="danger" %}
**Warning:**

* Always ensure the device is installed, connected, and commissioned by a qualified professional.
* The device must only be repaired by the manufacturer.
* Please do not use the logger's USB port for data logging, as it may damage the port and will not be covered under warranty.
  {% endhint %}

### Refer to the <mark style="color:blue;">R</mark>[<mark style="color:blue;">eXgen 1 Product Manual</mark>](https://docs.influxtechnology.com/support_guides/rexgen-series-product-manuals/rexgen-1/rexgen-1-product-manual) for more details.
