# How to Create an Access key and secret key to access the S3 Bucket?
* Sign in to your Amazon Web Services (AWS) account:
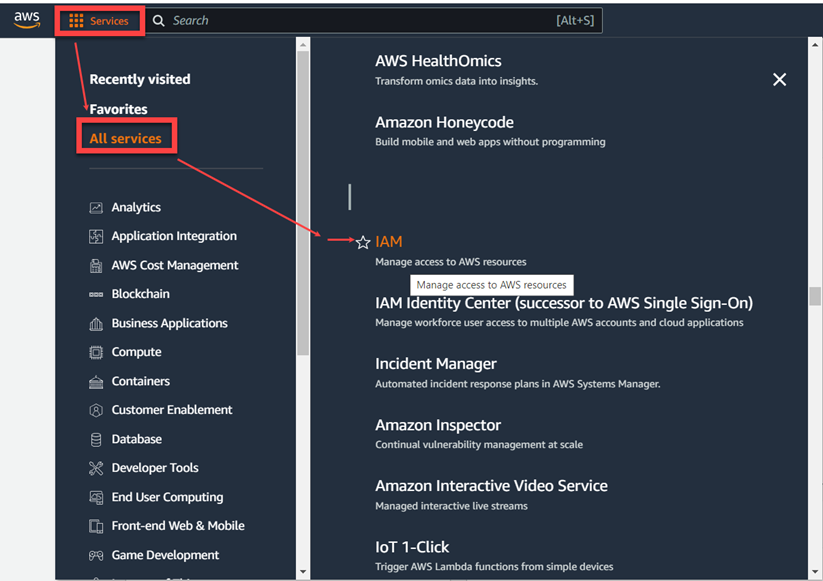
* Under Services, choose 'All services' and open the '[IAM' (Identity and Access Management) console](https://console.aws.amazon.com/iam/home?#home).
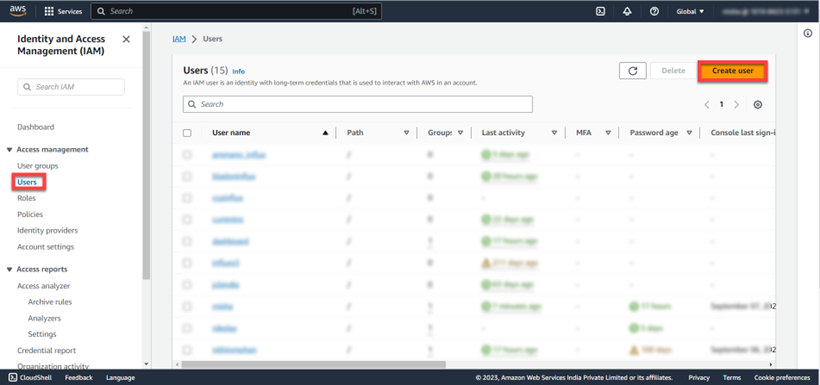
* Under 'Access management', click Users and then 'Create user'.
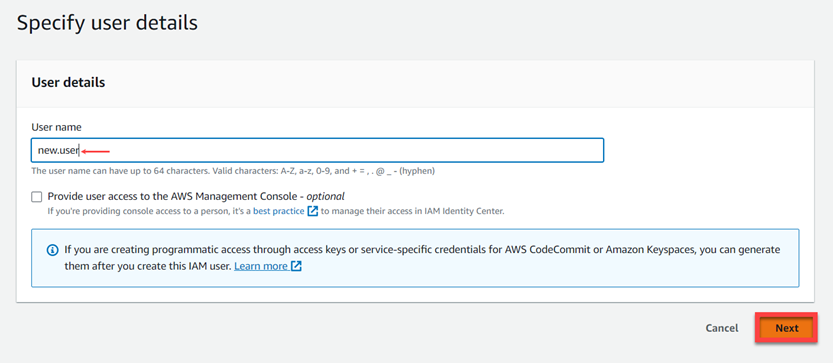
* Specify the IAM user name (read the other instructions properly and grant permissions as desired).
* Click 'Next'.
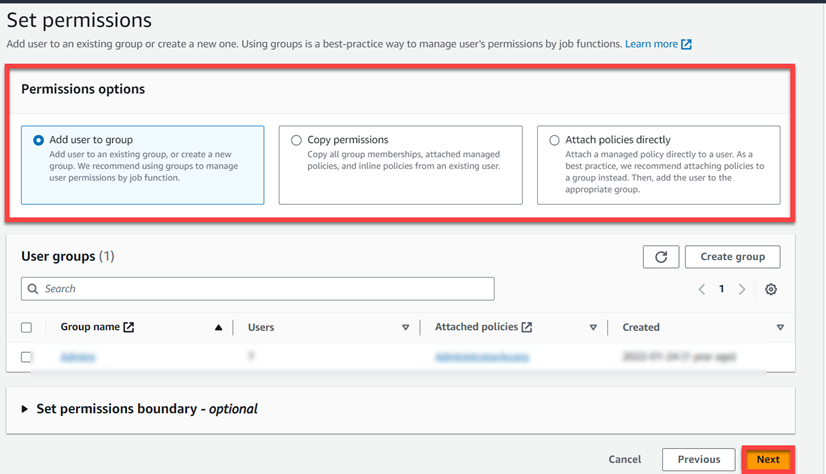
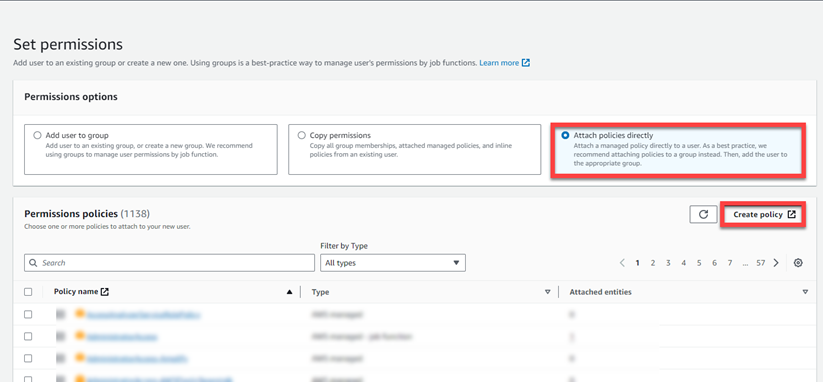
* The next step involves granting permissions to the user-specified.
* One can add this new user to the existing groups by selecting 'Add user to group' or to copy the policies from an existing user, select 'Copy permissions' options.
OR
* You can create a custom policy with the necessary permissions to restrict access to a single Amazon S3 bucket when creating an IAM policy for an IAM user using JSON. Select 'Attach policies directly' and click 'Create policy'.
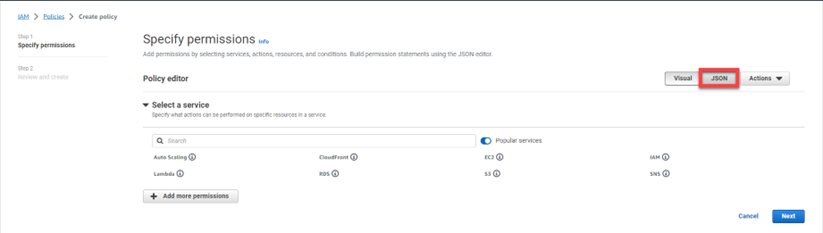
* Select 'JSON" from the displayed options.
* This displays the 'Policy editor window' where you can define the policy.
* Below is an example of a JSON policy that allows read access to a single S3 bucket named "my-example-bucket" (you can modify it to fit your specific requirements).
### Editable Example
```json
{
"Version": "2012-10-17",
"Statement": [
{
"Effect": "Allow",
"Action": [
"s3:*",
"s3-object-lambda:*"
],
"Resource": [
"arn:aws:s3:::your-bucket",
"arn:aws:s3:::your-bucket/*"
]
}
]
}
```
Detailed explanation for the example above:
Below is the detailed explanation for the example JSON policy to access a single S3 bucket named "example-bucket" (you can modify it to fit your specific requirements)
This JSON snippet represents an AWS IAM policy statement that grants permissions related to Amazon S3 (Simple Storage Service) and S3 Object Lambda for a specific bucket (`your-bucket`.
### Version
```
"Version": "2012-10-17"
```
The version here specifies the version of the policy language being used. This particular version (2012-10-17) is commonly used in AWS IAM policies.
### Statement
```
"Statement": [
{
"Effect": "Allow",
"Action": [
"s3:*",
"s3-object-lambda:*"
],
"Resource": [
"arn:aws:s3:::your-bucket",
"arn:aws:s3:::your-bucket/*"
]
}
]
```
Enclosed is the main body of the policy, where permissions are defined.
**Effect**: Specifies whether the statement allows (`Allow`) or denies (`Deny`) access. In this case, it allows access.
**Action**: Lists the actions that are allowed.
* `"s3:*"`: Allows all actions on S3 buckets and objects within the bucket.
* `"s3-object-lambda:*"`: Allows all actions on S3 Object Lambda, a feature that lets you run custom code on S3 GET requests.
**Resource**: Specifies the AWS resources to which the actions apply.
* `"arn:aws:s3:::your-bucket"`: Refers to the bucket itself (`your-bucket`) and allows actions on the bucket metadata.
* `"arn:aws:s3:::your-bucket/*"`: Refers to all objects within the bucket (`your-bucket/*`) and allows actions on all objects stored within the bucket.
### Explanation
**Permissions**: This policy grants full access (`s3:*`) to all operations on the bucket (`your-bucket`) and its objects (`your-bucket/*`). It also grants full access (`s3-object-lambda:*`) to S3 Object Lambda operations. Permissions include reading, writing, deleting, and performing any other operations permitted by S3 and S3 Object Lambda.
**Scope**: The policy applies only to the specific bucket (`your-bucket`) and its contents. It does not apply to other buckets or resources within AWS.
### Considerations
**Security**: Granting `s3:*` and `s3-object-lambda:*` Actions allow extensive control over the specified bucket and its objects. Ensure that such permissions are granted only to trusted entities and that potential security risks are carefully considered.
**Best Practices**: It is generally recommended that permissions be limited to only those actions and resources necessary for the intended use case, minimising the potential impact of accidental or malicious actions.
This policy would typically be attached to an IAM user, group, or role in AWS Identity and Access Management (IAM) to grant the specified permissions to that entity.
### To create and attach this policy to an existing IAM user, follow these steps:
1. Sign in to the AWS Management Console.
2. Navigate to the IAM service.
3. Create or select the IAM user to restrict access to.
4. In the "Permissions" tab for the user, click "Add permissions."
5. Choose "Attach existing policies directly."
6. Click the "JSON" tab and paste the JSON policy into the text box.
7. Review and click "Next: Review" to proceed.
8. Review the permissions and the policy you attached to the user.
9. Click "Add permissions" to attach the policy to the user.
You can modify the JSON policy to include additional actions or restrict access according to your requirements.
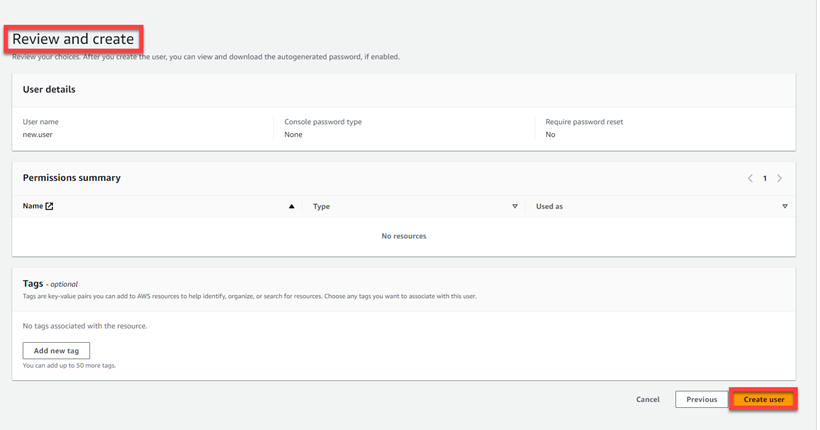
* Once you have defined the permissions accordingly, click 'Next'.
* Review the details specified and click 'Create user'.
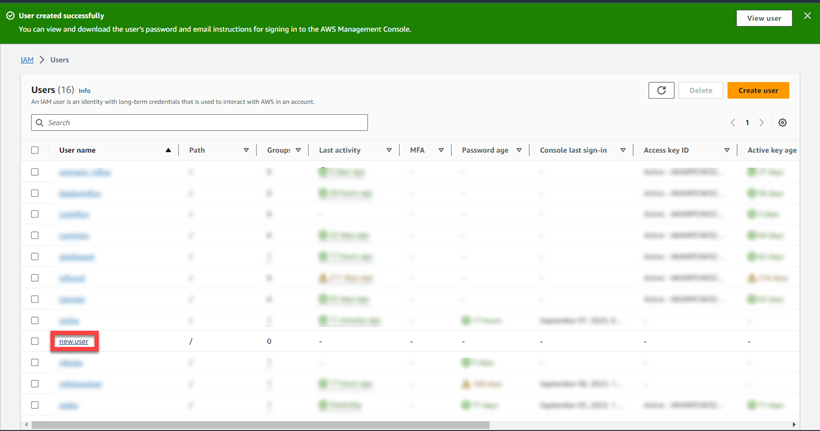
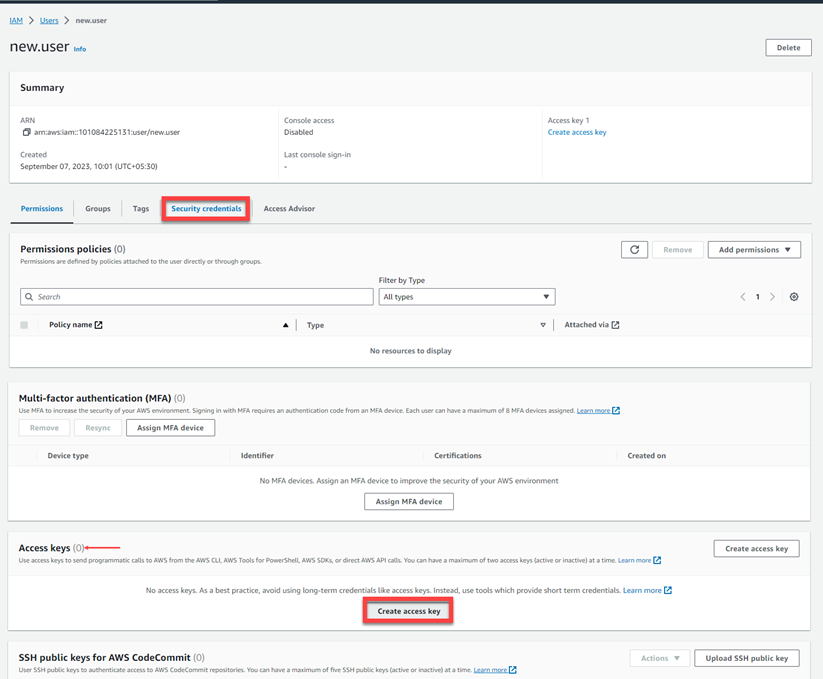
* Once the user is created successfully, identify and click on the name to proceed.
* Click Security credentials, and under Access Keys, click 'Create access key'.
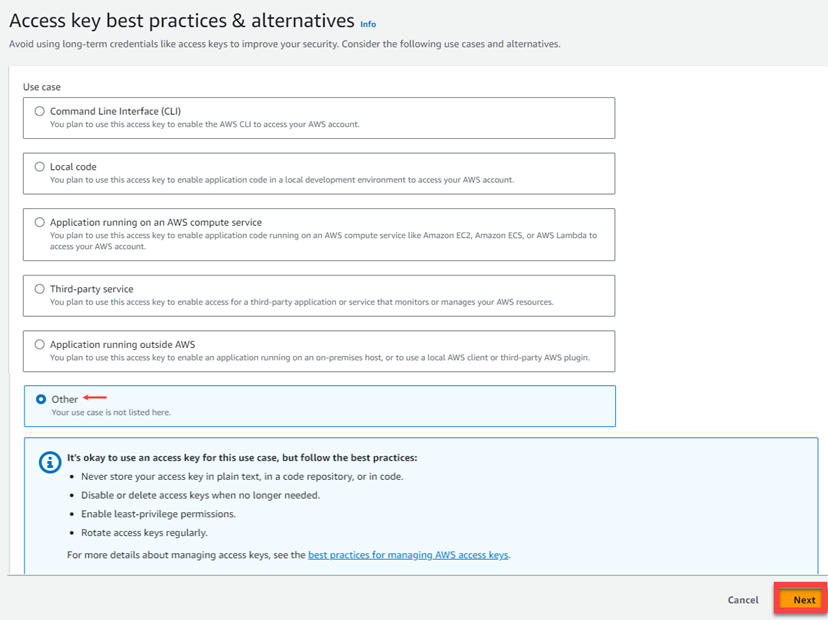
* This takes you to a screen which prompts you to consider use cases and alternatives.
* Click 'Other' (read the best practices for managing the access key).
* Click 'Next'.
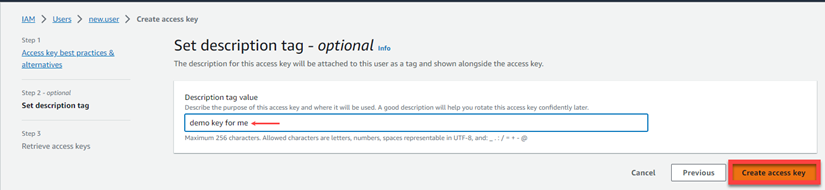
* Specify the description tag value and click 'Create access key'.
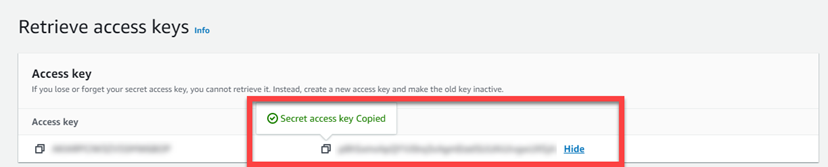
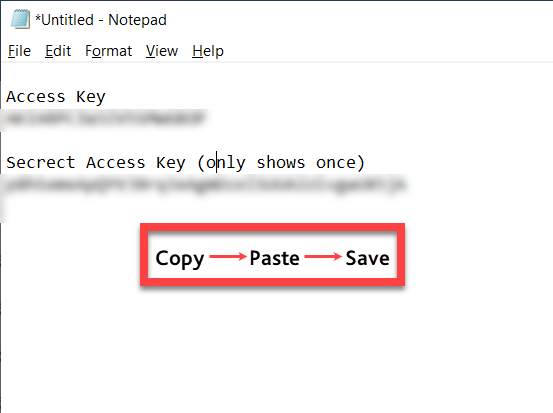
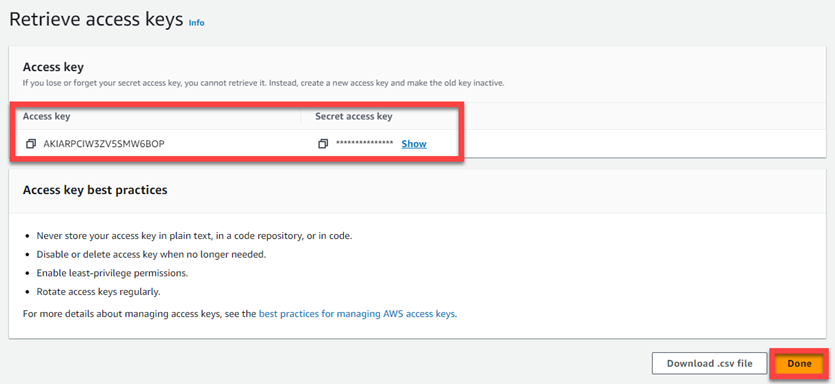
* This generates your Access and Secure Access keys.
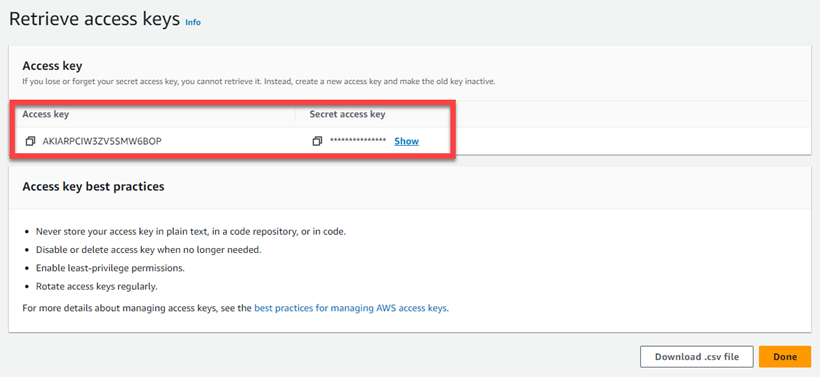
* Once the access key and the secret access keys are generated, copy and paste them to a secure location, as you can view the Secret access key only once.
* Click 'Done' to complete the process.
[Click to convert data using Lambda functions](https://docs.influxtechnology.com/support_guides/rexgen-series-product-manuals/rexgen-air-cloud-usage-guides/cloud-usage-guides-for-rexgen-air-device/deploying-lambda-function-to-aws)
To configure the logger and upload data, click Next.
---
# Agent Instructions: Querying This Documentation
If you need additional information that is not directly available in this page, you can query the documentation dynamically by asking a question.
Perform an HTTP GET request on the current page URL with the `ask` query parameter:
```
GET https://docs.influxtechnology.com/support_guides/rexgen-series-product-manuals/rexgen-air-cloud-usage-guides/cloud-usage-guides-for-rexgen-air-device/quick-start-guide-for-aws-s3-rexgen-air/how-to-create-an-access-key-and-secret-key-to-access-the-s3-bucket.md?ask=
```
The question should be specific, self-contained, and written in natural language.
The response will contain a direct answer to the question and relevant excerpts and sources from the documentation.
Use this mechanism when the answer is not explicitly present in the current page, you need clarification or additional context, or you want to retrieve related documentation sections.